How to measure the electric-to-acoustic transduction power loss of magnetic and ceramic earphone elements, with measurements of some headphone receiver elementsBy Ben H. Tongue Quick Summary: This Article describes a device and procedure for measuring the sensitivity of earphone elements. Its purpose is to provide a quantitative method for comparing elements. Elements may be easily sorted for application to listening to weak signals, as in crystal radio sets. Actual measurements of an assortment of elements is provided. 1. Measurements The Transduction power loss of a headphone element can be defined as the ratio of its output acoustical power to input electrical power. We will call it HPEL and express it in dB. A convenient way to measure HPEL is to use one element of a pair of identical headphone elements as a speaker and the other as a microphone, acoustically couple them together and then measure the input electrical power to the speaker element and the output electrical power from other element. Ten times the ratio of the log of the ratio of output to input power is the transduction power loss of the combination of the two elements, in dB. If the two elements are identical, the power loss of each is one-half that figure. Here is a step by step procedure:
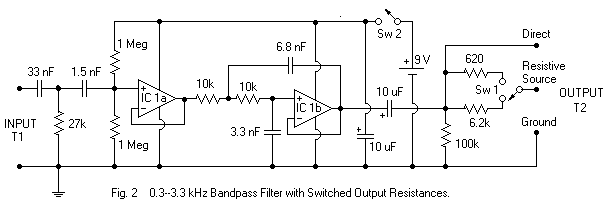
Figure 2 shows the circuit of a bandpass filter having -3 dB points
of 0.3 and 3.36 kHz with a loss of 0.4 dB at 1.0 kHz. It's powered
by a common 9 V. battery. Since the typical 1000 DC Ohms magnetic
earphone element has an impedance of 6000 Ohms and the typical balanced
armature sound powered magnetic element has an impedance of 600 Ohms, approximations
of these two resistance values are included in the switched resistive output
controlled by S1. An IC suitable for the circuit is an LF353 or an
MC34002.
A convenient source for white noise is the headphone output of a small
FM/AM transistor receiver, switched to FM and tuned to a point on the
dial where it receives no signal, just noise. The noise density
is rolled off at 6 dB per octave above 2.1 kHz by the de-emphasis filter
in the receiver, but this should make little difference in the results.
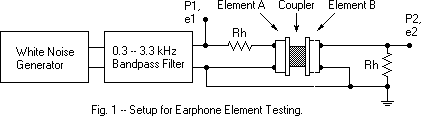
The acoustic coupler used to couple the two elements under test is based
on the ANSI 9-A earphone coupler. See "Acoustic Measurements by
Leo Beranek, pages 743 and 744". An approximation to the
ANSI 9-A coupler can be made of a piece of 1" nominal diameter,
medium weight copper tubing having a #120 O-ring glued on each end.
The length of the copper tube used is 0.26 inches. The I..D.
of the O rings is specified as 0.987" and thickness as 0.103".
1" copper tubing is specified to have an I.D. of 1.025 and an O.D.
of 1.125". The total enclosed volume is about 6 cubic cm.
An alternative coupler that may give similar results is a stack of eight
or nine 1/8 inch thick garden hose washers having an ID of about 5/8
inches. The ANSI 9-A coupler is (was?) the standard coupler used
in Audiometry when calibrating an earphone element with a standard microphone.
It is a greatly simplified version of a model of the human ear canal
with an earphone cushion pressing on it. Comments: The DVM should preferably be an RMS responding instrument. The typical DVM responds to the full wave rectified average signal and will probably be satisfactory. Don't use a meter that responds to the peak or peak-to-peak value of the AC signal.
* One of the RCA/GE units was about 6 dB less sensitive than the other.
Thanks to Dieter Billinger (sky_wave_99), I knew that some RCA/GE elements
having low sensitivity could be improved by sticking a small neodymium
magnet to the outside of the case. It worked in this case, increasing
sensitivity of the weak element by 6 dB, so it was somewhat more sensitive
than the other element. BTW, a magnet could not increase the sensitivity
of the other originally more sensitive element. These two units appear
to be of somewhat different construction. To easily compare the power
sensitivity of any two elements, even if they differ widely in impedance,
see Article #3.
To help in understanding these charts, consider that an eight dB (6.3 times) change of power is usually perceived as a two times subjective change in loudness.
2. Comparisons In order to compare the sensitivity of headphone elements that are
used flat against the ear, as well as those that are not, (but are inserted
into the ear canal (tips) or outer ear (buds)), I decided to make one
of my best elements a "standard" and compare the others to it using
a DFLVORA (see Article #3). That "standard" is a Western Electric
Sound Powered receiver element # D173012 held flat against one ear.
In the results shown below, two Mouser elements were tested and found
to be of equal sensitivity. (That was after I found one Mouser
to be weak until I whacked it several times.) The two Radio
Shack units also tested equal. Note that the DFLVORA can
be used to easily compare the power sensitivity of any two earphone
elements even if they differ greatly in impedance. For more information,
see the next-to-last paragraph in Section 1 of Article #2.
These comparisons were made using a voice signal from a small transistor radio fed into a DFLVORA with the radio volume set to a level at which I estimated I could understand about 50% of the words. Results may differ for people who are not old and do not have poor high frequency hearing, such as myself. The differences in tone quality between the standard element and a DUT will have a different effect on intelligibility for different people. The sensitivity values for the piezo electric elements can only be attained if the elements do not have a resistor placed across them to supply a DC path for diode detector current. The resistor adds loss (although this is a low cost approach to provide a DC path for the diode current). Also, if the resistor is made large in order to reduce its loss contribution, audio distortion will oftentimes take its place. The best way to drive the elements is to use an audio transformer to impedance match the diode detector output resistance to the average impedance of the element. The transformer supplies supply a DC return path for the diode. A further advantage of using a transformer is that no DC voltage can get across the piezo element. Sometimes, if a strong signal is tuned in and it produces a large rectified DC voltage on the element, the element will "freeze" and its sensitivity will drop. See Article #5 for info on transformer coupling and diode DC resistance loading. (The value of the DC load resistance on the diode should equal the average value of the AC audio load impedance.) * The comparison of the sensitivity of an element in a series connected element pair DUT with the "standard element" was made in the following manner: The full (two element) headphones DUT was connected to the J1 output of the DFLVORA. The DFLVORA was fed by a weak voice signal and the source resistance switch adjusted for the greatest volume and intelligibility. The "standard element" was then connected to the J2 output and the 3, 6, and/or 12 dB attenuators were adjusted so that the intelligibility of the voice in the "standard element" was equal to that in one element of the headphones DUT .(The other element was left dangling.) The amount of attenuation placed in the circuit feeding the standard element is a measure of the difference in sensitivity between the standard and the DUT. Since 1/2 the power going into the full headphones DUT goes into each element, one element of the DUT headphones being listened to receives 1/2 the power (3 dB less power) than that delivered to the full headphones, giving the reading for a single element a 3 dB handicap. Thus, the sensitivity of one element of the headphones DUT is 3 dB better than the sum of the readings of the attenuators. This 3 dB correction is made in the figures for the DUT in the table above. When doing a comparison of this type (comparing one element of the pair in a full headphones, to a single "standard element"), first check the volume in each of the two elements of the pair. If they are not equal, error will result. If the volumes are not too far apart, perform the measurement for each element of the pair and average the result. There is some error introduced by the procedure given above because the acoustic loading on each earphone of the pair is not the same. Summary:
In all cases it is assumed that the source resistance driving an element is equal to the average impedance of the element over the audio frequency range of interest. This is the closest that we can get to an impedance matched condition. Last item: Remember that headphone sensitivity can vary from unit to unit. The figures given above are not gospel for all units of a particular model. Diaphragms warp, magnets weaken and air gaps may get changed. All affect the sensitivity. #13 Published: 08/30/00; Last revision: 10/28/2004 |